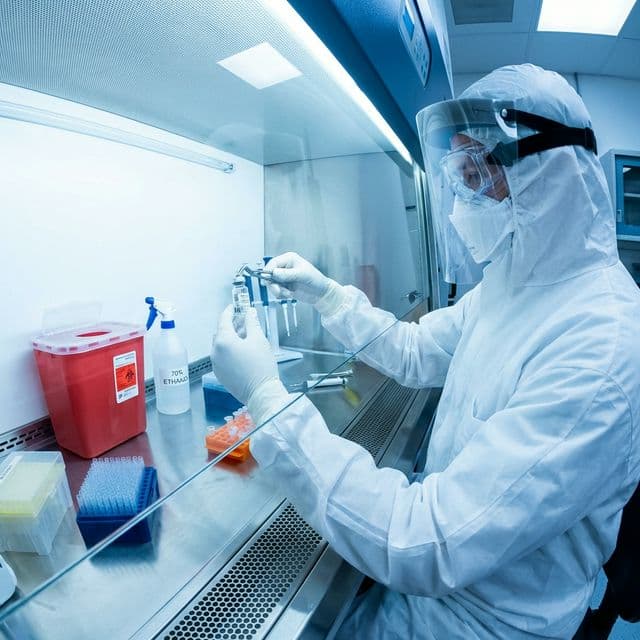
🔬 Pre-Session Safety Checklist
0/8A properly prepared workspace is the first and most important barrier against contamination. All peptide handling should be performed in a certified biosafety cabinet (BSC) when working with aerosol-generating procedures. For routine reconstitution, a clean benchtop with proper decontamination is acceptable.
Surface Decontamination Protocol
- Primary disinfectant: 70% ethanol or 70% isopropanol — wipe all surfaces before & after use
- For toxin-class peptides: Use 10% sodium hypochlorite (bleach) solution, 10-minute contact time
- Clean field: Lay lint-free disposable bench paper or absorbent pads as a working surface
- UV decontamination: Run BSC UV lamp for 15 minutes prior to use (if equipped)
💡 Pro Tip: The "Clean-to-Dirty" Rule
Always work from clean areas toward contaminated areas. Never move materials backward across this boundary. Place waste containers and used materials downstream (to the right for right-handed researchers, left for left-handed).
Ethanol vs. Bleach
Click to reveal70% ethanol is effective for general disinfection but does NOT inactivate all peptide toxins. Use 10% bleach (sodium hypochlorite) for toxin decontamination. Never mix bleach with ethanol.
BSC Class II Type A2
Click to revealThe recommended biosafety cabinet for peptide work. Provides both product and personnel protection with HEPA-filtered, recirculated airflow. Certify annually per NSF/ANSI 49.
Lint-Free Wipes
Click to revealStandard paper towels shed fibers that can contaminate peptide solutions. Use Kimwipes, cleanroom wipes, or equivalent lint-free products. Replace the clean field after each session.
Airflow Awareness
Click to revealWork at least 6 inches (15 cm) inside the BSC sash opening. Avoid rapid arm movements that disrupt laminar airflow. Never block rear or side air grilles.
Proper PPE is non-negotiable for peptide research. The minimum ensemble protects against skin contact, eye splash, and inhalation of lyophilized powder during reconstitution.
⚠️ Glove Selection Matters
Latex gloves provide inadequate protection against many solvents used in peptide reconstitution (DMSO, acetic acid, ammonium bicarbonate). Always use nitrile gloves. For hazardous peptides, double-glove and change the outer pair every 30 minutes or immediately after contamination.
🌡️ Peptide Storage Temperature Zones
Improper storage is the #1 cause of peptide degradation. Follow these evidence-based guidelines to maintain compound integrity throughout your research program.
Critical Storage Rules
- Always store lyophilized peptides at −20°C or below. Use −50°C to −80°C ultracold freezers for long-term (>6 months) storage.
- Desiccator equilibration: Allow vials to equilibrate to room temperature inside a desiccator (15–20 min) before opening to prevent moisture condensation.
- Protect from light: Peptides containing Trp, Tyr, or Phe are photosensitive. Use amber vials or wrap in foil.
- Oxidation-sensitive residues: Met (methionine), Cys (cysteine), and Trp (tryptophan) are particularly vulnerable. Flush vial headspace with nitrogen or argon gas before sealing.
- Aliquot, don't repeat freeze-thaw: Divide reconstituted peptide into single-use aliquots. Each freeze-thaw cycle degrades 5–15% of the peptide.
Critical: Never Re-Freeze Reconstituted Peptide
Once a lyophilized peptide has been reconstituted, it must be stored at 2–8°C and used within 28–30 days. Repeated freezing and thawing of reconstituted solutions causes irreversible aggregation and loss of biological activity.
Safe reconstitution requires proper solvent selection, sterile technique, and gentle handling to preserve peptide structure and biological activity.
Solvent Selection by Net Charge
📋 Quick Reference
Basic peptides (net positive charge): Dissolve in sterile water or 0.1% acetic acid / 25% acetic acid for stubborn sequences.
Acidic peptides (net negative charge): Use 0.1M ammonium bicarbonate (NH₄HCO₃) solution at pH ~8.
Hydrophobic peptides: Pre-dissolve in DMSO (≤10% final volume) then dilute with aqueous solvent.
The Wall-Flow Method
When adding solvent to the lyophilized peptide vial, aim the needle tip at the vial wall, allowing the solvent to flow gently down the side and onto the peptide cake. This prevents:
- Splashing peptide powder into the air (inhalation hazard)
- Foaming from rapid agitation of surface-active peptides
- Incomplete dissolution from compressed powder clumps
✅ Sterile Venting Technique
Always insert a sterile venting needle (0.22μm filter vent) into the vial before adding solvent. This equalizes pressure and prevents aerosolization when the needle is withdrawn.
Critical: Never Recap, Bend, or Break Used Needles
Needlestick injuries are the most common laboratory accident. Discard used needles and syringes directly into a rigid, leak-proof, puncture-resistant sharps container bearing the biohazard symbol (🔴).
Sharps Container Requirements
- Material: Rigid, puncture-resistant plastic (FDA-cleared)
- Color: Red with biohazard symbol
- Fill level: Replace when ¾ full — never overfill
- Placement: Within arm's reach of the work area, at benchtop height
- Closure: Use the built-in temporary closure between sessions; permanently seal when ready for disposal
Syringe With Needle
Click to revealDiscard the ENTIRE unit (syringe + needle) into the sharps container. Do not detach the needle. The one-handed "scoop" technique may be used ONLY if recapping is absolutely necessary.
Broken Glass Vials
Click to revealBroken glass contaminated with peptide solution is a sharps hazard. Use forceps or a brush/dustpan (never bare hands) to collect fragments and place in the sharps container.
Container Disposal
Click to revealSealed sharps containers are treated as regulated medical waste. Your institution's EH&S department will arrange pickup. Never dispose via regular trash or recycling.
Liquid Waste
- Chemical decontamination: Add 10% bleach (sodium hypochlorite) to liquid peptide waste. Maintain 30–60 minute contact time before disposal down the drain with copious water.
- DMSO-containing waste: Collect separately. DMSO is a penetration enhancer and can carry dissolved peptides through skin. Never pour DMSO waste down the drain.
- Acidic/basic waste: Neutralize to pH 6–8 before drain disposal. Keep acid and base waste containers separated to prevent violent reactions.
Solid Waste
- Contaminated consumables: Gloves, wipes, bench paper, pipette tips → red biohazard bag
- Autoclave cycle: Biohazard bags must be autoclaved at 121°C for 60 minutes before disposal as regular waste
- Incineration: Highly potent or toxin-class peptide waste may require professional incineration — consult your institution's EH&S
🧪 Waste Disposal Quick Quiz
Where does each item go? Test your knowledge!
Used syringe needle
Gloves contaminated with peptide residue
Empty, rinsed bacteriostatic water vial
Liquid peptide waste solution
Speed and calmness are equally important during a spill. Follow this step-by-step protocol to minimize exposure and contamination.
Evacuate & Alert
Clear the area immediately. Alert nearby personnel. If aerosol-generating, wait 30 minutes for particles to settle before re-entering.
Don Fresh PPE
Put on a clean lab coat, nitrile gloves (double-layer), goggles, and N95 respirator if the peptide is hazardous.
Contain & Decontaminate
Apply 10% bleach solution from the PERIMETER inward. Allow 20–30 minutes of contact time. For large spills (>100 mL), call EH&S before cleanup.
Absorb & Collect
Use absorbent pads or vermiculite. Scoop contaminated materials into a biohazard bag. Seal and label.
Final Surface Decontamination
Wipe all affected surfaces with 70% ethanol after bleach treatment. Allow to air dry.
Document & Report
Log the spill incident: substance, estimated volume, time, and cleanup steps. Report to your safety officer within 24 hours.
Emergency: Large Spills (>100 mL) or Unknown Substances
For large-volume spills, high-concentration peptide solutions, or any unknown substance: evacuate the room, close the door, and call your institution's emergency response team or Environmental Health & Safety (EH&S) department immediately. Do NOT attempt cleanup alone.
✅ Spill Kit Essentials
Keep a spill kit within 10 feet of all peptide work areas. Contents: absorbent pads, 10% bleach solution (pre-mixed), nitrile gloves, goggles, biohazard bags, forceps, bench paper, and a completed spill report form.